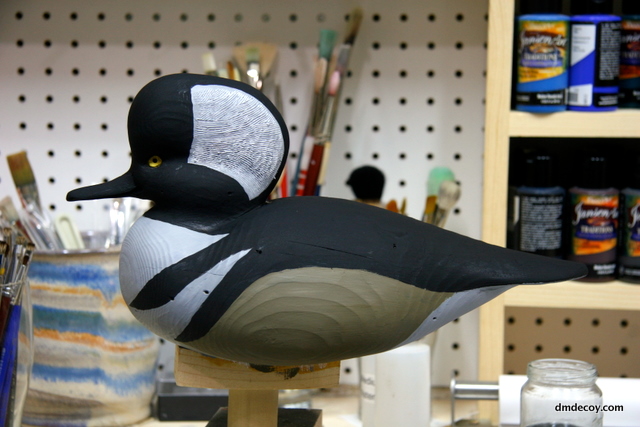
Here is a mini-demonstration of a simulated-antique hooded merganser I just made. I was reading through the rule book for the PDFA show in Sacramento that was coming up, and saw a category called "Doubtful Antiques". I didn't have much time but I thought I might be able to do a hooded merganser antique decoy that I've had in the back of my head for a while now.
This isn't a full demonstration but I does show a few of the steps I took to create this bird.
1 - Pattern design.
The first step was to design the decoy by developing a pattern. I browsed my library of hooded merganser photos and finally found a picture of the bird I wanted to base my pattern on. Here you can see a picture of that bird on my laptop, and the pattern I created based on it. I also drew an alternate head shape based on a different photograph. The most important thing to me for this bird was to capture the head shape and overall attitude of the bird. Since this is going to be an antique bird, I simply wanted the body to look pleasing and have some complimentary angles.
2 - Reinforce the bill
This is really meant to be a competition and display bird. The rules specifically say the decoy will not be floated and eventually this will end up on somebody's mantle. With all that being said, the bill of a hooded merganser is very thin and fragile in a soft wood like cedar, so I wanted to do something to ensure the bill is extra tough in case it is banged up or dropped.
After cutting the side profile of the head, I cut out a couple inches of a piece of hard maple and drew a rough finger joint. I cut out the finger joint on the maple, then drew the cut pattern onto the head and cut it out too. You can see that it's a decent fit now. I'll be using epoxy to attach so I wasn't worried about a perfect joint.
At the center-line, I drilled an 1/8" hole for a piece of brass rod I'm going to insert.
the brass rod is inserted and I've coated both pieces with thickened marine epoxy.
Now I bring the two pieces together.
And clamp them together.
After the epoxy has cured, I cut out the top view of the head.
3 - Carving
I've skipped ahead a bit and I'm now complete with the carving. You can see now how the maple insert has blended in nicely with the cedar head.
4 - Raise the wood grain
Now that the carving is complete, I want to raise the grain a little. It's a neat technique I picked up somewhere along the way. What I do is take a propane torch and burn the entire decoy. When a level of char builds up on the bird, I take a scotch-brite pad and some steel wool and scrub the char off the bird. Since the wood and the sap rings burn at different rates, it begins to develop a textured appearance. I'll repeat this process a few times until I'm happy with the look.
This body was carved from a piece of center-cut white cedar. It was heart wood had developed radial crack and still contained the pith. It wasn't a piece of wood I'd use on working or competition decoy, but it's perfect for an antique. I concentrate the flame on the imperfections. The heat can help open up cracks that already exist.
These pictures were taken after the torching was complete and I had sealed the the bird with a coat of wax-free shellac.
5 - Prime and base coat
Here I've base-coated the bird with Ronan Japan Colors. You can see how the raised grain of the wood shows through.
6 - Paint and Distress
Here's the final product. After base-coating the bird, I painted it with GrumbacherPre-Tested Oils. Once the paint had dried, I began to distress the bird. The main thing I do is to rub the paint with steel wool and scotch-brite pads to remove some paint from the high spots of the grain. I also like to focus on areas that would normally be subjected to extra abuse like the head, bill and tail. Another thing to do is to just generally bang it around and drop it onto hard surfaces such as loose stone.
I also attached a brass ring with a small leather loop to act as an anchor attachment.
There's always a moment of hesitation for me between the painting and distressing stages. It feels a little odd to finish up painting a perfectly good bird and start throwing it at the ground and beating it up. It does end up looking pretty cool though
And that about does it. This is a simple antiquing job. There are others that really have this down to a science. For me, this was a side project that I had wanted to do for a while and something I really had fun with.


